Advanced Infection Prevention Management Solutions

Used items

Your safety first: How to handle used or newly bought items

Learn more

Cleaning

The first and decisive step for successful reprocessing

Learn more

Disinfection

Significant reduction of the microbial contamination

Learn more

Inspection

A close look at functionality and efficiency

Learn more

Packaging

Only correctly packaged items can maintain their long-term sterility

Learn more

Sterilization

The power to reduce germs to their absolute minimum

Learn more

Storage

Prolong sterility by optimum conditions

Learn more

Environment

Reduce the risk of transmission of pathogenic microorganisms to healthcare workers, patients and visitors.

Learn more

Definition

[juːst] adjective
All dental items & instruments used during treatment as well as newly purchased items if not pre-sterilized by the manufacturer.

For a seamless and interactive online experience of our multimedia content (e.g. videos, maps), please accept the storage of the necessary cookies (YouTube, MovingImage - detailed information on these cookies can be found in the imprint/data protection) for marketing purposes.

Accept

Important steps

The pre-disinfection phase of used items is crucial to reduce the germs contamination and thus to minimize as much as possible the risk of cross-infection for staff during the transportation and cleaning of instruments.

The pre-disinfection phase should occur in the treatment room.
All used and non-used instruments shall be pre-disinfected immediately after the treatment. They will be further transferred to the reprocessing room in a closed box.
Local regulations should also be considered.

Cookies not accepted
01

First step: Information

Check your local regulations regarding the reprocessing of dental instruments as well as the relevant instructions for use.

02

Next step: Pre-disinfection & pre-cleaning

Wipe the entire surface of the transmission instruments or unit with disinfectant to remove any residue and to prevent any settling on the internal parts.

03

Next step: Flushing & soaking

If your local guidelines recommend carrying out pre-cleaning directly in the treatment area:
Clean the medical device immediately after every treatment to flush out any liquid (e.g. blood, saliva) and to prevent any settling on the internal parts.

04

Next step: Transport

Put all pre-cleaned and pre-disinfected items onto a tray or into a suitable puncture-proof container for safe and prompt transport to the reprocessing room.

05

Important

Note, that the disinfectant used during pre-treatment is only for your personal protection and cannot replace the disinfectant step after cleaning.

Next step in the AIMS cycle

Cleaning

W&H Best Practice:

  • For your own safety make sure you wear protective clothing, safety glasses, face masks and gloves (PPE) during treatment and while pre-disinfecting any used instruments.
  • Purge handpieces with a flow of water directly at the dental chair and clean the outer surface with a cleaning and disinfectant wipe.
  • Use one wipe per handpiece.
  • Keep the instruments humid to prevent any settling of organic material.
  • Dispose all single-use materials.
  • Immerge all instruments (in line with manufacturer instructions for use) into a disinfectant/detergent solution.
  • Separately, immerge burs in a specific dedicated disinfecting/detergent solution for the peculiar reprocessing required and to prevent any damages.

Important facts

Handling used/contaminated instruments poses a high risk of infection, so wearing personal protective equipment is of the utmost importance. Learn more about the risk of cross-contamination and the chain of infection.

Efficient infection prevention is a must

Besides the current risk of Sars-CoV2, there are several other pathogenic disease-causing microorganisms that can have a major impact on your health and your patient’s health.

Wearing PPE and strictly following the reprocessing process is therefore a must.

For more useful information about protective measures in the dental practice, please click here.

Ways of transmission

The common mechanisms of transmission in healthcare settings, including dental practices are:

Direct transmission: e.g. direct contact with blood or body organic fluid, soil, inoculation into skin or mucosa, droplets and aerosols
Indirect transmission: e.g. unclean hands inoculation by contaminated instruments, sprays, or splashes from e.g. dental aerosols, syringe, fomite borne, airborne

For specific information about aerosols, please click here.

Ready, steady, read!

Always refer to the manufacturer’s instructions for use before starting to reprocess your used items or items you have bought new.

Download White Papers about Used items

Knowledge is power

Find more scientific based details about risks of infection and the chain of infection with the following white papers.

Definition

[ˈkliː.nɪŋ] noun
Removal of visible dirt, blood, proteins, microorganisms and other debris from dental medical devices or instruments.

For a seamless and interactive online experience of our multimedia content (e.g. videos, maps), please accept the storage of the necessary cookies (YouTube, MovingImage - detailed information on these cookies can be found in the imprint/data protection) for marketing purposes.

Accept

Important steps

Proper and accurate cleaning is essential to ensure that all visible dirt is removed from the instruments. This is crucial in order not to compromise the following phases - disinfection and sterilization.

Manual cleaning is performed with the use of a detergent solution and soft brushes of various sizes.

All instruments must be rinsed and completely dried after cleaning. Brushes must be cleaned and disinfected/sterilized at least daily.

Cookies not accepted
01

First step: Dismantling

If possible, dismantle the medical device according to the manufacturer’s instructions.

02

Next step: Rinsing

Rinse each instrument carefully under running water (<36°C/96.8°F to avoid protein coagulation).
Make sure all surfaces and recesses are exposed to water by rotating the instrument/item.

03

Next step: Cleaning

Clean the instrument/the parts with an appropriate cleaning agent. Rinse thoroughly after cleaning.

04

Next step: Drying

Air dry and/or hand dry using a clean, disposable, non-linting cloth.

05

Important

For successful disinfection, it is essential to dry the instruments and parts after cleaning. For further information, please click here.

Next step in the AIMS cycle

Disinfection

W&H Best Practice:

  • In terms of efficiency and safety, always prefer an automatic cleaning method.
  • Always wear PPE and punctured proof, heat-resistant gloves.
  • Make sure that the instruments to be cleaned are compatible, (according to the manufacturer's instructions), with the chosen cleaning method.
  • Cleaning is ideally carried out using a validated cleaning process, e.g. a washer or thermal washer disinfector (TWD)
    If this is not available, batch records should be kept indicating who was responsible for cleaning the devices.

Ultrasonic cleaning allows thorough and accurate cleaning of even the most difficult parts to reach of the medical devices (e.g., knurling, hinges, handle). Handpieces must not be reprocessed in ultrasonic baths.

The cleaning solution must be changed in regular intervals, at least daily and whenever there are visible biological residues on the bottom of the tank. All instruments must be rinsed and completely dry after cleaning.

Cookies not accepted
01

First step: Dismantling

Dismantle the instrument according to the manufacturer’s instructions.

02

Next step

Carry out the ultrasonic cleaning by following the manufacturer’s instructions.

NB: Don’t forget to change the cleaning solution regularly (at least once a day and whenever there are visible biological residues on the bottom of the tank).

03

Next step: Drying

Air dry or hand dry using a clean, disposable, non-linting cloth.

04

Important

For successful disinfection, it is essential to dry the instruments and the parts after cleaning.
For further information, please click here.

Next step in the AIMS cycle

Disinfection

W&H Best Practice:

  • In terms of efficiency and safety, always prefer an automatic cleaning method.
  • Always wear PPE and punctured proof, heat-resistant gloves.
  • Make sure that the instruments to be cleaned are compatible, (according to the manufacturer's instructions), with the chosen cleaning method.
  • Cleaning is ideally carried out using a validated cleaning process, e.g. a washer or thermal washer disinfector (TWD)
    If this is not available, batch records should be kept indicating who was responsible for cleaning the devices.

Automatic cleaning ensures high quality, repeatable with consistent results and full traceability. It drastically reduces the risk of injury and subsequent infection to the operator.

All instruments are automatically rinsed and dried after cleaning.

Cookies not accepted
01

First step: Dismantling

Dismantle the instrument according to the manufacturer’s instructions.

02

Next step

Follow the user instructions for the related cleaning or reprocessing unit.

03

Next step

Load the cleaning unit or TWD accordingly to the instructions for use.

04

Important

For successful disinfection, it is essential to dry the instrument/the parts after cleaning.For further information, please click here.

Next step in the AIMS cycle

Disinfection

W&H Best Practice:

  • In terms of efficiency and safety, always prefer an automatic cleaning method.
  • Always wear PPE and punctured proof, heat-resistant gloves.
  • Make sure that the instruments to be cleaned are compatible, (according to the manufacturer's instructions), with the chosen cleaning method.
  • Cleaning is ideally carried out using a validated cleaning process, e.g. a washer or thermal washer disinfector (TWD)
    If this is not available, batch records should be kept indicating who was responsible for cleaning the devices.

Important facts

Cleaning is the most crucial step of the reprocessing process. Learn here about the basic principle and other facts.

Sinner’s Circle – The basic principle of cleaning

Whether it is performed automatically or manually, effective cleaning needs water – and four main physical factors that interact with each other:

  1. Time (exposure time of the other three factors)
  2. Chemical (usually a cleaning solution)
  3. Mechanical power (e.g. scrubbing to establish contact with the cleaning solution and remove visible dirt)
  4. Temperature (affects, for example, the effectiveness of the cleaning solution)

Proportions of the factors can be altered but at the end must make up a complete pie. More about Sinners’s Cycle: The history of Sinner’s Circle

Legal advice

The reference standards for cleaning are EN ISO 15883-1 and EN ISO 15883-5. “A clean medical device can be defined as visually free of soil and quantified as below specified levels of analytes.” (extract)

Download White Papers about Cleaning

Knowledge is power

Find more scientific based details about the reason Why for cleaning with the following white papers.

Definition

[ˌdɪsɪnˈfekʃən] noun
Disinfection results in a reduction of the number of viable pathogenic micro-organisms on a product or instrument to a level that has been specified beforehand. This level corresponds to the intended further handling or use of the product.

For a seamless and interactive online experience of our multimedia content (e.g. videos, maps), please accept the storage of the necessary cookies (YouTube, MovingImage - detailed information on these cookies can be found in the imprint/data protection) for marketing purposes.

Accept

Important steps

The disinfection phase is essential to consistently reduce the pathogenic load, as well as any risks of cross-infection, and to favour the subsequent sterilization phase.

Treat the external surface of handpieces with a disinfectant-soaked wipe. Dip instruments that are not handpieces in a disinfection bath, ensuring all instruments are completely soaked and arranged so that their surfaces are in direct contact with the disinfectant solution.

Cookies not accepted
01

First step: Checking

Ensure that cleaning has been carried out effectively and that the medical device is completely dry internally and externally. Any moisture can reduce the impact of the disinfectant.

02

Next step: Reading

Check the related instructions for use of both the disinfectant and the instrument/device to make sure that they are compatible.
See also: EN ISO 17664

03

Next step: Wiping

Wipe down with disinfectant. Make sure that the entire surface of the instrument/device has been covered by the disinfectant. Please observe the action time of the disinfectant.

04

Start with Inspection

Scroll down to next step.

05

Important

Please always observe the specific manufacturer’s information with regard to whether chemical disinfection processes are compatible with the instrument: EN ISO 17664.

06

Next step: Check dryness

Ensure that cleaning has been carried out effectively and that the medical device is completely dry internally and externally. Any moisture can reduce the impact of the disinfectant.

07

Next step: Instructions for use

Check the related instructions for use of both the disinfectant and the instrument/device to make sure that they are compatible.
See also: EN ISO 17664

08

Next step: Immersion

Follow the instructions for use to ensure the disinfection bath is carried out as specified. The instruments and/or medical products must be fully immersed in the liquid disinfectant.

09

Next step: Rinsing

Abundantly rinse with tap followed by demineralized water. The quality of water used should be appropriate to the clinical procedures to be undertaken. Water deionizing devices such as Multidem provide suitable water quality.

10

Next step: Drying

Fully remove any water residues, especially inside lumens (hinges, pipes), using filtered gentle compressed air and non-woven disposable tissues.

11

Start with Inspection

Scroll down to next step.

Next step in the AIMS cycle

Inspection

W&H Best Practice:

  • Use a thermal washer disinfector with an automatic drying phase.
  • Always ensure that the instruments can be reprocessed in a thermal washer disinfector according to the manufacturer's instructions for use.
  • Always ensure that the instruments are loaded in the correct way and that the appropriate washing program is selected.

A single, repeatable and validated process that, together with the disinfection of instruments, ensures a high standard of cleaning. This minimizes the possibility of injuries and subsequent infections to the operators.

Cookies not accepted
01

First step: Treatment area

Immediately after use instruments must be pre-cleaned to ensure that organic material will not dry on.

02

Next step: Transport

If pre-cleaning is not carried out in the treatment area, instruments shall be placed in a suitable covered puncture-proof container and shall be kept moist to prevent drying of any liquid (blood, saliva).

03

Next Step: Reprocessing room

Dismantle the instruments according to the manufacturer’s instructions for use.

04

Next Step: Washing & disinfection

Follow the related instructions for use of the TWD as well as the instruments to ensure the procedure is carried out successfully. Please be aware that instruments might require special maintenance following the thermal washer disinfection process.

05

Start with Inspection

Scroll down to next step

Next step in the AIMS cycle

Inspection

W&H Best Practice:

  • Use a thermal washer disinfector with an automatic drying phase.
  • Always ensure that the instruments can be reprocessed in a thermal washer disinfector according to the manufacturer's instructions for use.
  • Always ensure that the instruments are loaded in the correct way and that the appropriate washing program is selected.

Important facts

The purpose of disinfection is to reduce disease-causing germs in such a way that any potential infection chain can be broken, and the germ count is kept as low as possible.

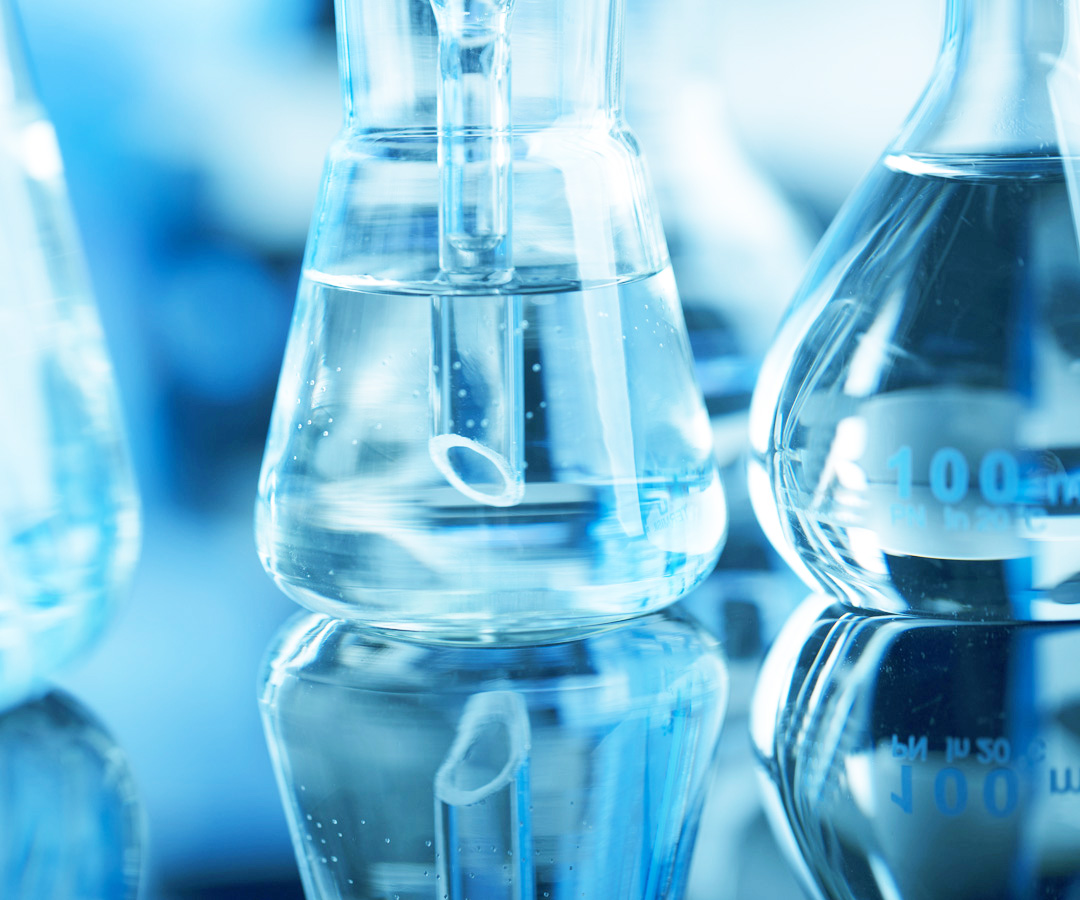
Chemical disinfection

Chemical disinfectants contain active substances that kill and/or inactivate germs. Among other things, this effect is based on the chemical disinfectant’s ability to destroy the microbial cell wall, or to inhibit specific metabolic processes of the germs resulting in cell death.

Chemical disinfectants for dental practices

Dental practices shall use disinfectants offering a range of action covering the widest pathogenic spectrum possible (bacteria, fungi, viruses). There are specific tests that disinfectants must meet in order to make claims of disinfectant activity against specific pathogens (EN 1276 and EN 13704).

Note that if a product or active substance has been tested successfully for the whole spectrum of disinfectant activities, including sporicidal activity, it cannot be regarded as a sterilant.

Legal advice

The reference standards for thermal disinfection are (EN ISO 15883-1 and EN ISO 15883-6. ). ‘Disinfection results in a reduction of the number of viable micro-organisms on a product or instrument to a level that has been specified beforehand. This level corresponds to the intended further handling or use of the product.’ (extract)

Download White Papers about Disinfection

Knowledge is power

Definition

[ɪnˈspekʃən] noun
Inspection is the generic term for the inspection, maintenance and testing of all cleaned and disinfected dental items.

For a seamless and interactive online experience of our multimedia content (e.g. videos, maps), please accept the storage of the necessary cookies (YouTube, MovingImage - detailed information on these cookies can be found in the imprint/data protection) for marketing purposes.

Accept

Important steps

A careful inspection, maintenance, and testing of all cleaned and disinfected items gives proof of their functionality and guarantees a long service life. Moreover, the risk of infection – both for you and for your patients – is minimised thanks to the identification of damaged or soiled items.

Inspect all items:

  • For any visible soil such as blood or dental cements.
  • For any remaining drops of liquid, which can cause corrosion.
  • In case of wet items: dry immediately to avoid new contamination.
  • For all items that are not completely clean: go back to the start.

Inspection and maintenance must be carried out in the reprocessing area only. Use a proper oil to lubricate hinged and rotary instruments.

Cookies not accepted
01

First step: Inspection

Inspect all items for any visible soil such as blood or dental cements as well as for any remaining drops of liquid, which can cause corrosion. For all items that are not completely clean: go back to the start. (Yes, it is a bit like a board game).

02

Next step: Quick drying

Devices that are still damp or wet must be dried quickly using a lint free cloth. Any instruments with cavities must be dried quickly using compressed air. Timing is everything, because only quick drying helps to prevent any new contamination.

03

Next step: Reassemble

Reassemble multipart instruments to ensure all parts are complete and present. Please always check that the individual parts have matching serial numbers.

04

Next step: Maintenance

Maintain all items according to the manufacturer’s advice. For turbines, contra-angles, handpieces and couplings, now is the time to carry out a complete, quick and reliable maintenance of the inner parts, e.g. with the help of our Assistina devices.

For the maintenance of jointed instruments, such as scissors, W&H recommends using F1 Service Oil.

05

Next step: Storage or use

Check the Spaulding Classification to make sure that you are on the right track.

Sterilizable devices
Non sterilizable devices

For sterilizable devices and instruments please take a look at the next step.

Next step in the AIMS cycle

Packaging

W&H Best Practice:

Use an automated device to lubricate turbines, contra-angles, handpieces and couplings. Make sure all items are completely clean and dry before maintaining.

  • For optimum conditions, use an LED-illuminated magnifying glass.
  • Use proven processes and automatic devices to lubricate instruments after each cleaning to ensure longer service life.

Important facts

The cleaning, disinfection, drying, and function of instruments must be checked carefully. Any deposits such as lime-scale or organic matter such as blood and proteins can impair the sterilization and cause further risks of infection.

Instruments and devices that are damaged or corroded also pose a risk of infection for both you and your patients.

Only a dried item is a good item

It is of the utmost importance that all items are dried after cleaning and disinfection. Moisture and heat promote the growth and replication of micro-organisms. So instruments for immediate use that are temporarily stored wet become contaminated again. Dryness is also a must prior to packaging and sterilization.

Packaged and sterilized instruments that have not been dried could compromise sterilization. Wet packages are not compatible with sterile storage.

Maintain the maintenance

The product lifetime and the medical device’s ability to operate correctly are mainly determined by mechanical stress during use and chemical influences due to processing.

Maintaining the products after cleaning, disinfection, and drying is therefore an essential part of quality management and the reprocessing process.

Please refer to the related instructions for use to ensure adequate maintenance.

Handpieces in particular need regular lubrication.

Download White Papers about Inspection

Knowledge is power

Find more scientific based information about the importance of correct inspection and maintenance:

Definition

[ˈpækɪʤɪŋ] noun
Preparation and packaging of sterilizable items before sterilization.

For a seamless and interactive online experience of our multimedia content (e.g. videos, maps), please accept the storage of the necessary cookies (YouTube, MovingImage - detailed information on these cookies can be found in the imprint/data protection) for marketing purposes.

Accept

Important steps

Packaging system’s goal is to ensure long-term and full sterility at the point of use of the items. The packaging must consist of a microbial barrier and protective packaging.

Use bleached crêpe paper or wraps combining cellulose and synthetic fibres. They are permeable to steam, air and chemical vapours and provide an effective barrier when packs are stored in clean and dry conditions.

Cookies not accepted
01

First step: Inspection

Ensure that inspection has been carried out effectively so that all components of the item in question are dry and free of any soil and/or damage.

02

Next step: Information

Follow the specific technical instructions of your packaging material.

When using paper-like materials, either an envelope or parcel packing procedure should be used.

03

Next step: Avoid tension

Make sure the sterilization package is large enough for the items for sterilization. The filled sterilization package must not be under tension.

04

Next step: Sealing

Seal package with a heat resistant, markable adhesive tape.

05

Next step: Labelling

Follow the instructions for use provided by the manufacturer of your sterilizer regarding labelling. If labelling is recommended before sterilization put the label sticker that have you already prepared on the package. Do not write directly on the packaging material. For full traceability W&H recommends noting the following information:

  • The product name/contents of the packaging (if not visible)
  • The name of the person who releases the batch
  • The estimated expiry and/or sterilization date
  • Any sequential numbering for identification (in the event that identification is requested)
06

Next step: Sterilization

The packaged items are now ready for the sterilization process.

07

Start with sterilization

Scroll down to next step.

Next step in the AIMS cycle

Sterilization

W&H Best Practice:

  • Use a sealing device and sterilization rolls to preserve long-term sterility of items.
  • Ensure pouches are not too small (tight) or too large.
  • Ensure pouches are 3 fingers (or 30%) larger than instruments to avoid damage or poor drying during sterilization.

Cassettes and containers consist of re-usable receptacles intended for sterilization. These methods are suitable for repeated use and optimisation of loading and storage.

Cookies not accepted
01

First step: Inspection

Ensure that inspection has been carried out effectively so that all components of the item in question are dry and free of any soil and/or damage.

02

Next step: Avoid tension

Make sure you have chosen the right size pouch. Pouches should not be too small (tight) or too large as they could be either damaged or cut, or not dried properly. W&H recommends using pouches that are 3 fingers larger (or 30% larger) than the instruments.

03

Next step: Sealing

Follow the specific instructions for use of the packaging, sealing and documenting unit.

04

Next step: Sterilization

The wrapped items are now ready for the sterilization process.

05

Start with Sterilization

Scroll down to next step.

Next step in the AIMS cycle

Sterilization

W&H Best Practice:

  • Use a sealing device and sterilization rolls to preserve long-term sterility of items.
  • Ensure pouches are not too small (tight) or too large.
  • Ensure pouches are 3 fingers (or 30%) larger than instruments to avoid damage or poor drying during sterilization.

Important facts

Only perfectly sealed pouches will preserve the sterility of their contents. Labelling makes it possible to link instruments to their sterilization cycle and patient file.
The reference standard for packaging is EN ISO 11607.

Sealing is important!

Packaging with automatic sealing guarantees long-term sterility and automated documentation.

Where items are packaged manually, please pay special attention to the sealing process. Only items that are completely packaged and correctly sealed guarantee sterility after sterilization.

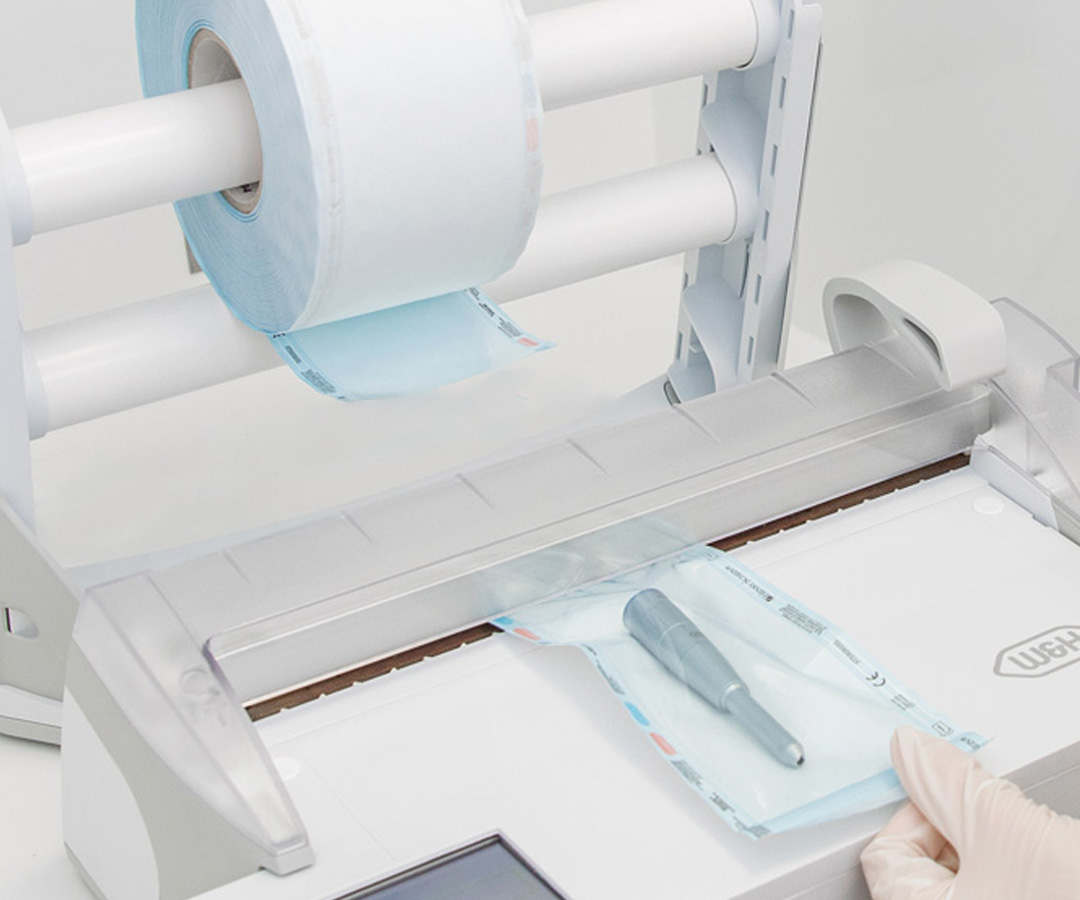
Labelling ensures traceability

Labelling packages is part of the traceability procedure. It will make it possible to link instruments to their sterilization cycle and to the patient's records. The label should identify the sterilizer, the type, and number of the sterilization cycle, the person in charge, the sterilization date and, potentially, the expiry date of the load.

Download White Papers about Packaging

Knowledge is power

Read more about Packaging by downloading our related white paper.

Definition

[sterəlaɪˈzeɪʃn] noun
Set of methods and means used to eliminate all living micro-organisms in any form including spores.

For a seamless and interactive online experience of our multimedia content (e.g. videos, maps), please accept the storage of the necessary cookies (YouTube, MovingImage - detailed information on these cookies can be found in the imprint/data protection) for marketing purposes.

Accept

Important steps

Sterilization guarantees the elimination of germs, including spores that cause infection. All instruments must be sterilized to ensure they are sterile at the point of use.

The reference standards for steam sterilizers are:
EN 13060 defines requirements for the manufacture of small steam sterilizers. According to this standard, sterilizers are divided into 3 types:

  • Type B, intended for the sterilization of all types of loads, such as porous, solid and hollow instruments both wrapped and double-wrapped
  • Type N sterilizers, intended for the sterilization of non-wrapped solid products
  • Type S sterilizers, intended for the sterilization of products specified by the manufacturer of the sterilizer

EN 285 defines requirements for the manufacturer of big steam sterilizers
ANSI/AAMI ST55 is the North American standard for steam sterilization. According to this standard, sterilizers are divided into 2 types: gravity displacement and dynamic air removal.

Cookies not accepted
01

First step: Inspection

For all instruments, make sure functionality has been checked and any maintenance has been carried out correctly. Pouches should be 3 fingers (or 30%) longer and larger than the instrument(s).

02

Important

In order to optimise drying, place all pouches paper side up or down according to the sterilizer manufacturer’s recommendations. All W&H sterilizers require paper side up.

03

Next step: Avoid overloading

Follow the sterilizer IFU regarding the tray/chamber loading method. Overlapping of pouches could impede drying. Do not exceed the maximum number/mass of instruments that can be processed by the selected cycle.

04

Next step: Information

Select a cycle designed and validated for the type of instruments to be processed.

05

Important

B-type cycles are compatible with all load types that are single or double pouched.

06

Next step: Check dryness

Upon completion of the cycle, check the integrity and dryness of each package. The paper side must be absolutely dry. If not, instruments cannot be released as sterile. Instead they must be unpacked and returned to step 1 ‘used items’.

07

Next step: Link to patient file

W&H offers a safe and practical system for linking instruments and sterilization cycles to the patient records – the W&H Lisa Safe Label printer.

The label printer connects directly to any W&H sterilizers that allow label printing only if the sterilization cycle was completed successfully.

08

Proceed to storage

Scroll down to next step.

Next step in the AIMS cycle

Storage

W&H Best Practice:

  • Select type B cycles according to EN 13060 or dynamic air removal sterilizers according to ANSI/AAMI ST55.
  • Visually check the load at the end of the sterilization cycle to evaluate the integrity and drying of the wrapped items. Please note, that only perfectly dried, and intact packs can be stored.
  • Adopt a traceability procedure to link sterilization cycle, load and patient by providing tangible proof that items were sterilized. Thanks to EliTrace, the advanced traceability feature offered by Lisa, it is even possible to trace back to the individual instrument and/or kit without any extra software or a computer.
  • Place all pouches paper side up or down according to the sterilizer manufacturer’s recommendations in order to optimise drying. Do not overlap pouches or exceed the maximum number/mass of instruments that can be processed by the selected cycle.
  • Integrate a water treatment system to prolong the service life not only of your sterilizer but also of your instruments.
  • Carry out periodical tests such as leakage (vacuum), Helix, Bowie & Dick tests and checking loads according to your local regulation guidelines.

Important facts

The purpose of continual germ reduction at each stage of the reprocessing procedure, right through to sterile reusable products, is to reduce the microbial population to the Sterility Assurance Level of 10-6, i.e. a 6 log reduction. In other words, to achieve a probability of 1 non-sterile item in a million.

Steam sterilization

Extended steam sterilization is currently the only recommended method to minimize the risk of prion transmission through surgical instruments. Due to the principle of thermal denaturation, steam sterilization is also effective against drug-resistant bacteria.

The importance of treated water

Steam sterilizers require the use of treated water, whether it's distilled or demineralized. This will prolong the lifespan not only of your sterilizer, but also of your instruments. Poor quality water (hardness, chlorine) leads to damage, stains and corrosion to both your sterilizer and your instruments.

Download White Papers about Sterilization

Knowledge is power

Find more scientific based information about the power of steam sterilization and the importance of water quality with the following white papers:

Definition

[ˈstɔ:rɪʤ] noun
The action or method of storing and preserving sterilized packaged instruments as well as disinfected non-packaged instruments.

For a seamless and interactive online experience of our multimedia content (e.g. videos, maps), please accept the storage of the necessary cookies (YouTube, MovingImage - detailed information on these cookies can be found in the imprint/data protection) for marketing purposes.

Accept

Important steps

Choosing the correct storage location ensures the maintenance of sterile conditions. Keep packed items in dry and dust-free conditions so that they are ready and safe for usage at all times.

Sterile goods must be stored in a dry, dust-free environment. Following the “First in – first out” – concept makes regular checks easier: store freshly sterilized packaged instruments at the back of the shelves, so that packaged instruments towards the front that were sterilized at an earlier date will be used next. So, the first in will also be the first out.

Cookies not accepted
01

First step: Inspection

Ensure that the packaging of the sterilized goods is dry. If there are any pouches that are wet or damp, they are not considered sterile and are not suitable for storage as wrapped sterilized items. Instead they must be unpacked and returned to step 1 ‘used items’. See also ‘Wet and moist packaging after sterilization’

02

Next step: Labelling

Items that are not already labelled must be labelled now, documenting that the sterilization process has been executed successfully.
The label must include the date of sterilization, the person in charge for releasing the load and the expiry date, if available.

03

Next step: Transport

Make sure that the sterile devices are transported in a manner that will not compromise their status. Transport should be carried out quickly.

04

Next step: Storage

Store the sterilized items according to your individual storage system.

05

Next step: Regular checking

Check the status of stored items at regular intervals. As soon as there are any signs of damage the items can no longer be regarded as sterile.

06

You completed the AIMS workflow

and your instruments are now ready for reuse.

Next step in the AIMS cycle

Environment

W&H Best Practice:

  • Ensure sterile items are transported in a manner that does not compromise their status. Transport should be carried out quickly.
  • Refer to the technical instructions of your packaging manufacturer and local guidelines concerning the expiry date.
  • Check the status of stored items at regular intervals. As soon as there are any signs of damage, the items can no longer be regarded as sterile.

Important facts

The loss of sterility essentially depends on the external influences present during storage, handling, and transportation. When it comes to determining the possible storage duration, the storage conditions themselves are crucial.

Ideal conditions for safe storage of sterilized items

Sterile goods must be stored in a dry, dust-free environment.

  • The storage area should be clean, regularly maintained and separated from non-sterilized products.
  • The shelf life of the sterile goods depends on the storage conditions and the packaging used.

Storage/transport of disinfected items and non-wrapped sterilized items

Disinfected items and non-wrapped sterilized items for immediate use must be transported aseptically.

  • Do not place them near the chair, as they may become contaminated by non-sterilized items.
  • Do not place them near sinks or in other humid conditions.
  • Ensure that they are not touched by or do not come into contact with items that have already been used.

Download White Papers about Storage

Knowledge is power

Get more insights with the following white papers:

Environmental Infection Prevention

The set of techniques, procedures and best practices which, when applied consistently in healthcare contexts, have as their objective the prevention or significant reduction of the risk of transmission of pathogenic microorganisms to healthcare workers, patients and visitors.

For a seamless and interactive online experience of our multimedia content (e.g. videos, maps), please accept the storage of the necessary cookies (YouTube, MovingImage - detailed information on these cookies can be found in the imprint/data protection) for marketing purposes.

Accept

Important Steps

The hygiene and maintenance of the premises, where dental work is performed, are essential preconditions to ensure that all daily activities are carried out in total safety. These steps allow you to guarantee the health and safety of both patients and dental practice staff.

The treatment room must be sanitized after each patient, all other rooms in the practice must be cleaned and disinfected at least once a day.

After each treatment, reassemble the set of instruments used, such as handpieces, mirrors, scalers, curettes, explorers, suction cannulas, etc., and bring them all to the reprocessing room.

Remove all protection such as films and similar from the dental unit and dispose of them in the appropriate bin, dedicated to hazardous waste. Clean and disinfect all surfaces within a two-meter radius of the dental unit, with one dedicated pre-soaked wipe or soaked cloth per surface.

Always use a dual-function product for cleaning and disinfecting, with a full spectrum of efficacy against pathogens (virus, bacteria, mycobacteria, fungi, yeast and mold) and with the shortest possible holding time. Always use a cleaning and disinfecting agent that is compatible with both sensitive and resistant surfaces.

Cookies not accepted
01

Dispose of hazardous waste

Remove all protection such as films and similar from the dental unit and dispose of them in the appropriate bin dedicated to hazardous waste.

02

Surgical lamp

Start treating the surgical lamp and then its support.

03

Dental chair

Treat the entire surface of the dental chair with a uniform movement, starting from the headrest down to the footrest.

04

Dentist side

Decontaminate the external surface of the handpieces on the quiver; treat the first handpiece and the associated supply line (pulleys and whips) with a detergent and disinfectant wipe; afterwards, immediately place it back on the dedicated tray after disconnecting it from its location. Repeat the same procedure for all the handpieces on the quiver, taking care to use a new wipe for each of them. Treat the integrated or trolley-quiver and the associated tray-holder or support surface using a clean wipe for each surface.

Using a wipe, clean the pedal board (rheostat) and the associated connection cable to the dental unit, if present (not wireless version). Clean the dentist's stool, the armrest, the adjusting lever and the mobile stand.

05

Assistant side

Treat the suction unit control in a similar way to the quiver, externally cleaning and disinfecting the suction lines and the control panel used by the assistant. Always clean the spittoon bowl, the tap and the support surface for the glass using detergent and disinfectant wipes. Clean the stool used by the assistant, any armrest, the regulating lever and the mobile stand.

06

Further accessories

Clean and disinfect the monitor for x-ray display, the whitening lamp and all the accessories that form part of the dental unit.

07

Patient’s vicinity

Remove all materials that need to be disposed of from the support surfaces in the treatment room and treat all surfaces, shelves, cabinets, doors and handles with detergent and disinfectant wipes. Clean the sink and tap. Remove any protective films from the intra-oral x-ray and proceed with cleaning and disinfection using wipes suitable for the treatment of delicate surfaces. Always clean the internal and external door handles with detergent and disinfectant wipes.

W&H Best Practice:

  • Always use dual-function cleaning and disinfecting wipes.
  • Only use products that ensure high-level disinfection (completely virucidal – enveloped and non-enveloped virus and mycobactericidal), with the widest possible pathogenic spectrum (viruses, bacteria, yeasts, fungi and molds), and the shortest possible holding-time.
  • Make sure that the disinfectant used is compatible with both delicate and resistant surfaces.
  • Always respect the product holding time indicated by the disinfectant manufacturer.
  • To avoid compromising the effectiveness of the product, only use one side of the wipe, making sure that it is well distributed and in complete contact with the surface to be treated.
  • Do not use the wipe by folding it on itself.
  • Use a new wipe every time you are about to treat a new area or use more wipes for large surfaces.
  • Remember not to overuse the wipe as its cleaning and disinfectant effectiveness would no longer be guaranteed.
  • A wipe measuring 13 cm by 18 cm can be effectively used for an area of approximately 50 cm square.
  • If you use a cleaning and disinfectant spray instead of wipes, make sure it has the same characteristics and performance as those mentioned above.
  • Never dispense the product directly on to the surface being treated but rather on to a disposable support made of non-woven-fabric or similar material, at a distance of 8–10 cm.
  • Make sure that you used the correct distribution technique when using the product for cleaning and disinfection; choose an application direction (from left to right or from top to bottom) and then pass the wipe with an oscillating movement along the chosen application direction. In this way we avoid the risk of secondary contamination by reprocessing the same area twice.
  • If you use a concentrated product, always choose one with a lower dilution percentage.

All rooms such as the reprocessing room, reception, waiting room, toilets, locker room, communal areas for employees, medical offices, etc., in the dental practice must be cleaned and disinfected since they are potentially at high risk of being vectors of cross-infection for all practice staff and patients.

All main surfaces must be considered, including floors, doors, handles, windows, coffee tables, coat stands, chairs, desks, etc. Follow this cleaning and disinfecting procedure at the end of the working day and whenever visible soiling contamination occurs, to immediately restore safe environmental conditions for patients and staff.

Cookies not accepted
01

In the reprocessing room, clear all support surfaces, removing any materials, protections and accessories used that are not intended to be reused such as needles, saliva aspirators, gauzes, etc.

02

Treat all support surfaces, cabinets, doors and handles, and shelves, with detergent and disinfectant wipes.

03

For the other rooms outside the reprocessing and treatment rooms, dilute the product, according to the manufacturers instructions, and choose the container (bucket, spray bottle, etc.), suitable for the type of application that you want to perform on large surfaces (pavements, doors, handles, desks).

W&H Best Practice:

  • Always use dual-function cleaning and disinfecting wipes.
  • Only use products that ensure high-level disinfection (completely virucidal – enveloped and non-enveloped virus and mycobactericidal), with the widest possible pathogenic spectrum (viruses, bacteria, yeasts, fungi and molds), and the shortest possible holding-time.
  • Make sure that the disinfectant used is compatible with both delicate and resistant surfaces.
  • Always respect the product holding time indicated by the disinfectant manufacturer.
  • To avoid compromising the effectiveness of the product, only use one side of the wipe, making sure that it is well distributed and in complete contact with the surface to be treated.
  • Do not use the wipe by folding it on itself.
  • Use a new wipe every time you are about to treat a new area or use more wipes for large surfaces.
  • Remember not to overuse the wipe as its cleaning and disinfectant effectiveness would no longer be guaranteed.
  • A wipe measuring 13 cm by 18 cm can be effectively used for an area of approximately 50 cm square.
  • If you use a cleaning and disinfectant spray instead of wipes, make sure it has the same characteristics and performance as those mentioned above.
  • Never dispense the product directly on to the surface being treated but rather on to a disposable support made of non-woven-fabric or similar material, at a distance of 8–10 cm.
  • Make sure that you used the correct distribution technique when using the product for cleaning and disinfection; choose an application direction (from left to right or from top to bottom) and then pass the wipe with an oscillating movement along the chosen application direction. In this way we avoid the risk of secondary contamination by reprocessing the same area twice.
  • If you use a concentrated product, always choose one with a lower dilution percentage.

Skin and hand care, from cleansing and disinfection to moisturizing, is a daily challenge. It is important to allow the natural hydrolipidic film of the skin to reconstitute. When the skin is extremely dehydrated, it can crack and develop small cuts that expose us to an even greater risk of infection.

Always use products that are hygienically safe, gentle, suitable for frequent use and dermatologically tested.

Disinfectants and washing lotions must meet the requirements of the relevant standards.
Washing lotions must be mild and include substances that protect the natural skin barrier.
Protection creams and lotions must absorb quickly and leave no residue on the skin.

Cookies not accepted
01

At the beginning of and throughout the working day

  • Wash your hands with a non-aggressive detergent with a neutral or possibly slightly acidic pH.
  • Use the surgical technique to treat all areas of the hands.
  • Dry your hands thoroughly using a disposable tissue.
  • Apply a sanitizing solution and wait until it is completely dry.
  • Use a moisturizing and protective cream before putting on gloves, to protect the skin from direct and prolonged contact with the gloves themselves.
  • Reapply the sanitizing solution to the gloves.
  • Start treatment
02

At the end of the working day

  • Wash your hands by applying a non-aggressive detergent with a neutral or possibly slightly acidic pH.
  • Use the surgical technique to treat all areas of the hands.
  • Afterwards, dry your hands thoroughly using a disposable tissue.
  • Apply a sanitizing solution and wait until it is completely dry.
  • Use a moisturizing and protective cream to facilitate and accelerate the reconstitution of the skins natural protective hydrolipidic film.

W&H Best Practice:

  • Only use dermatologically tested and non-aggressive products.
  • Always use a fast-acting product which leaves no residue on the skin.
  • Always follow the manufacturers instruction for use.

Important Facts

The purpose of disinfection is to reduce disease-causing germs in such a way that any potential infection chain can be broken, and the germ count is kept as low as possible.

Chemical Disinfection

Chemical disinfectants contain active substances that kill and/or inactivate pathogenic microorganisms. This effect is based, among other things, on the ability of the chemical disinfectant to destroy the microbial cell wall or to inhibit specific metabolic processes of the germs, causing their death or inactivation.

Chemical Disinfectants for Dental Practices

Dental practices must use disinfectants that have a wide pathogenic spectrum (bacteria, viruses, mycobacteria, fungi, yeasts and molds), ensuring High-level disinfection in a very short time. There are specific tests that disinfectants must perform in order to make claims of disinfectant activity against specific pathogens (EN 14885 and related).

Download White Papers about Environment

Knowledge is Power

Find more scientific information regarding risks of infection and the chain of infection as well as a template for your individual Cleaning & Disinfection schedule.

For a seamless and interactive online experience of our multimedia content (e.g. videos, maps), please accept the storage of the necessary cookies (YouTube, MovingImage - detailed information on these cookies can be found in the imprint/data protection) for marketing purposes.

Accept
For an optimal user experience, please reload the page.